SNS Simen
Multipurpose WooCommerce WordPress Theme
Thank you for purchasing our theme. If you have any questions that are beyond the scope of this Documentation, please contact us via comment on ThemeForest or create a topic to our support forum: http://snstheme.com/forums/forum/wordpress-theme/. Thanks so much!
- Created: December 04 2015
- By: snstheme
- Current Package Version is 1.0
Our theme using Visual Composer and Revolution Slider. You can find document about it via the bellow links:
Revolution Slider: http://www.themepunch.com/revslider-doc/slider-revolution-documentation/Visual Composer: http://go.wpbakery.com/getting-started
These are videos How to Install and Active Theme, How to install Demo Content and set your Home Page and Setting Footer Widgets and use Widget Logic to set Widgets for each page. You can also refer some intro by text bellow
1. Installation
When you download theme from themeforest and unzip, you will be got full of main files for theme installation. It has:
- Documentation : Contains documentation file of the theme
- snssimen.zip : "SNS Simen - Multipurpose WooCommerce WordPress Theme" installation file
- snssimen-child.zip : Theme Child
- PSD : Contains all source PSD files of the theme
There are 2 ways to Install Theme:
- Install Theme from the WordPress Dashboard
- Install Theme via FTP
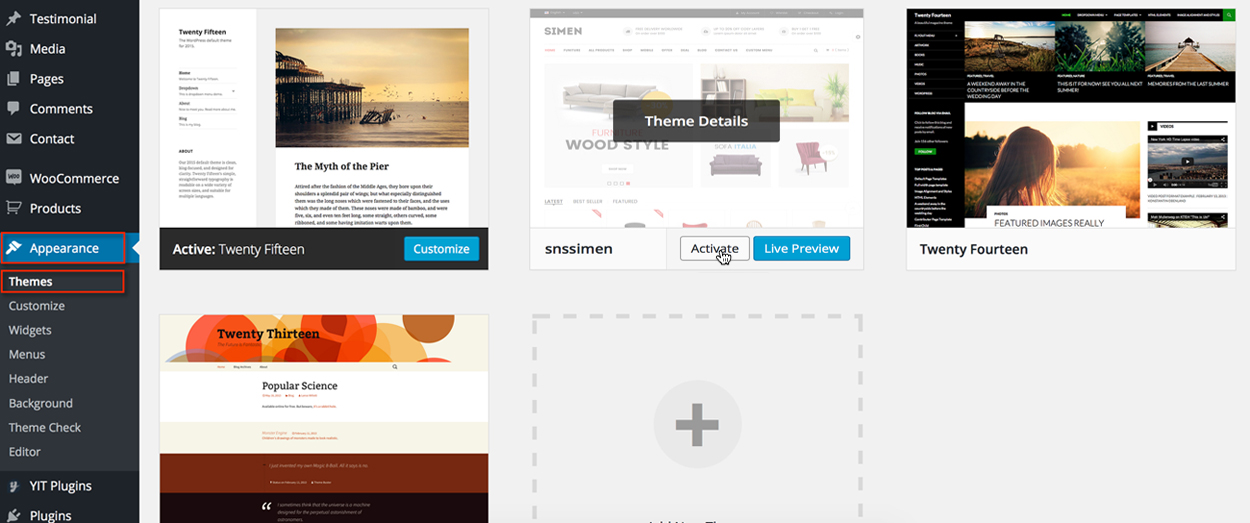
1.1 Install Theme from the WordPress Dashboard
- Navigate to
Appearance->Themesin your WordPress admin dashboard. - Click the
Add Newbutton at the top of the page and go for the Upload option. - For the file upload, pick
snssimen.zipin the theme package downloaded from ThemeForest and clickInstall Now.
1.2 Install Theme via FTP
Many users are on shared hosting with low upload limits, and in such situations the Striking theme is often too large to install through Wordpress. We suggest you should upload it via FTP.
To install theme via FTP you just only upload and unzip snssimen.zip file to: YOUR_ROOT/wp-content/themes/
If you don't know how to use FTP visit this link for information: http://codex.wordpress.org/FTP_Clients. And learn from Wordpress Official Documentation about installing theme with FTP client or with cPanel: http://codex.wordpress.org/Using_Themes
1.3 Active snssimen as default theme
After completing the upload and intstall. If you have not activated, please activate it now. To do it: Go to your Dashboard >> Appearance >> Themes and click activate snssimen
1.4 Install Required Plugins
After activating the theme you will be asked to install the required plugins

Then click on Begin installing plugins to install and active all Required Plugins.
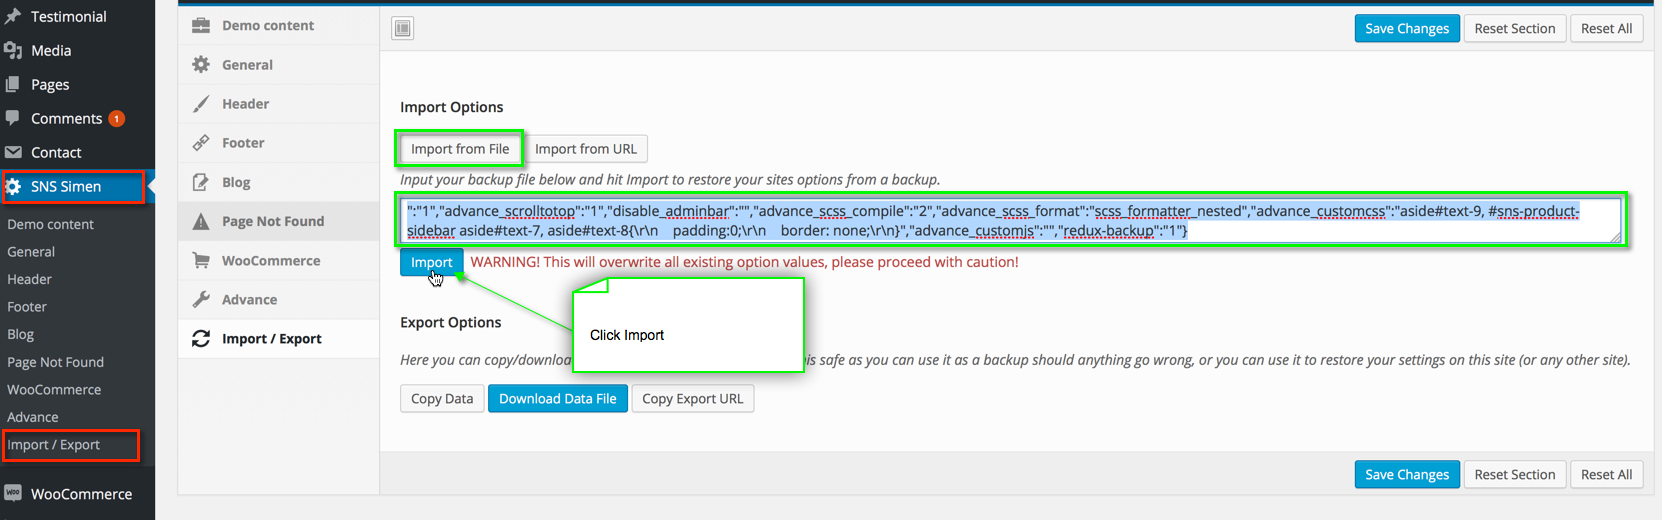
1.5 Theme Options
If you dont want Install Demo Content, you can also Import default options for Theme Options
To import default option, please follow steps:
- Go to:
Admin >> SNS Simen >> Import/Export >> Import Options >> Sellect: Import from File - Open and copy the content of file path:
YOUR_ROOT/wp-content/themes/snssimen/framework/sample-data/data/theme-options.json - Paste the conten above to form and click
Import
2. Install Demo Content
From your admin panel, navigate to SNS Simen >> Demo Content at here you can click to button Import to install our demo content
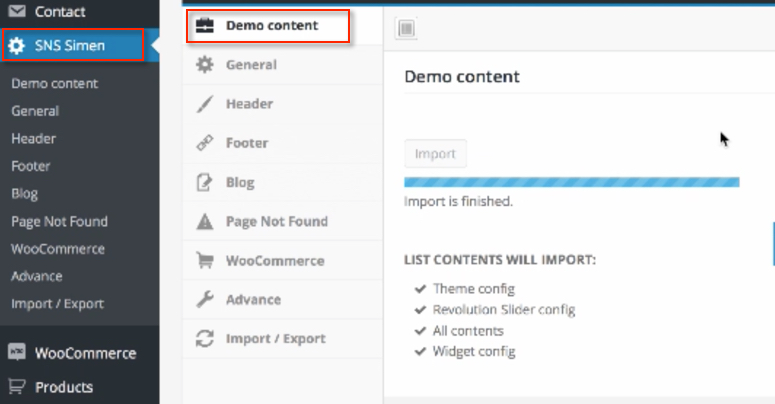
To Install Demo Content work well, please ensure 2 the points bellow:
- Please Deactive plugin
Wordpress Importerif you have installed it. - Recommended PHP Configuration Limits
- max_execution_time 180
- memory_limit 128M
- post_max_size 32M
- upload_max_filesize 32M
You should contact your web host and ask them to increase those limits to a minimum as follows:
Note: Maybe it will take your time from 2 - 15 miniutes to finished.
3. Setting Home Page
Admin >> Pages >> All Pages will have some Home Page to you refer settings3.1 Create/Edit your Homepage
You can quickly build a home page using Visual Composer for WordPress that is drag and drop frontend and backend page builder plugin that will save you tons of time working on the site content. You will be able to take full control over your WordPress site, build any layouts you can imagine – no programming knowledge required
- From your Dashboard admin Navigate to Pages
- Select All Pages to see all page then:
- Or click edit one page you want
- Or Select Add New to create new page
3.2 Set your Homepage
- Go to
Settings > Readingin your WordPress Dasrdoard panel - Set
Front page displaysto aStatic Page. - In the drop down menu for
Front Pagechoose a page which will be your home page. - Leave the drop down menu for
Posts pageempty, as this is not used by the theme. - Save changes.

4. Setting Blog Page
4.1 Create the blog post
From your Admin panel navigate to Posts >> Add New, then fill your information:
- Start filling in the blanks: enter your post title, write your actual body content in the main post editing box below it.
- As needed, select a category, add tags, and make other selections from the sections below the post.
- You can create blog post with a lot of Formats like link, gallery, image ..... Select format you want to create on Format from in right sidebar.
- When your post is ready, click Publish.
4.2 Manager current all blogs
Navigate to Posts >> All Posts you can see all informations of you blog post, add new, edit or delete them.
4.3 Setting Blog Pages
From your admin panel you can navigate to SNS Simen >> Blog to setting for Blog Page. If you wanna your site have one more Blog Page style you can navigate to Pages >> New Page and create page with short code SNS Blog Page. This shortcode provided options for you to setting Blog Page style with each page
If you have installed Demo Content then at Admin >> Pages >> All Pages will have some Blog Pages to you refer settings
5. Setting Contact Page
Admin >> Pages >> All Pages will have some Contact Us page to you refer settingsFrom your Dashboard admin Navigate to Pages, Select All Pages to see all page then:
- Or click edit one page you want
- Or Select Add New to create new page.
Use Visual Composer to drag and drop element you want. With our demo we're using shortcocdes: Google Maps, Text Block, Contact Form 7
NOTE: With Contact Form 7 you can create/edit form at Admin >> Contact >> Contact Forms
6. Setting Woocommerce
6.1 Setting Woocommerce from Theme Options
From your Dashboard admin, navigate to SNS Simen >> Woocommerce at here we provided some options for Product Page.
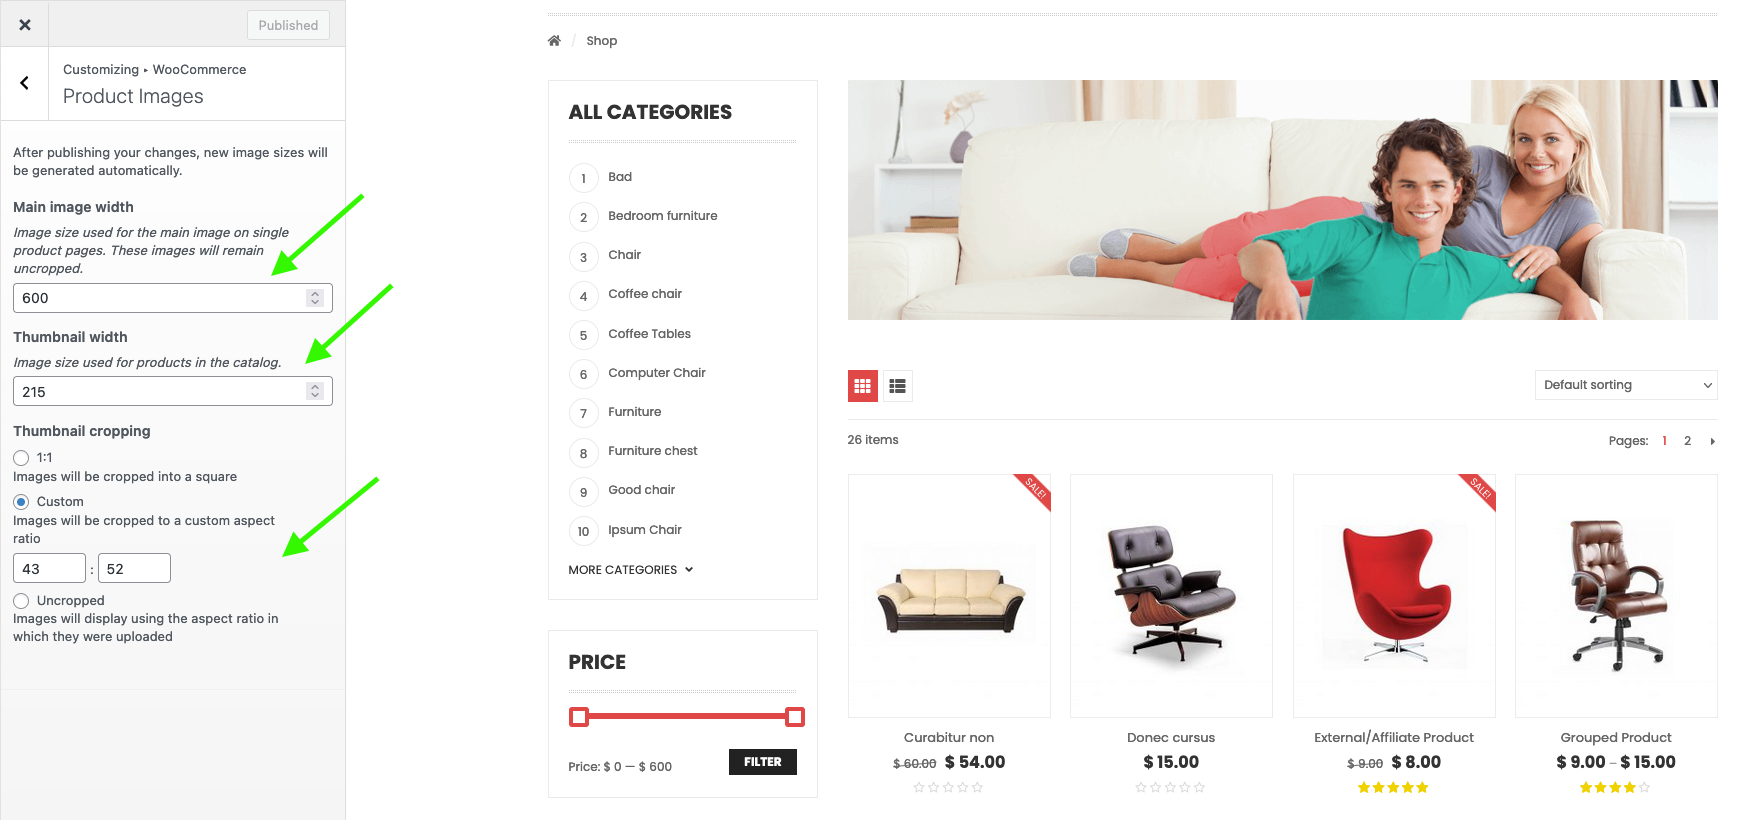
6.2 Setting Product Display
From your Dashboard admin, navigate to Admin >> Appearance >> Customize >> WooCommerce(Near Additional CSS) >> Product Images and config like image bellow:
6.2 Setting Checkout
From your Dashboard admin, navigate to Woocommerce >> Settings >> Checkout >> Checkout Options and sellect Cart Page & Checkout Page
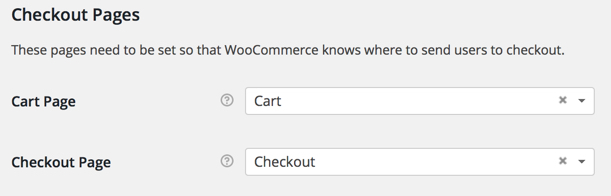
Dont forget refer document from Woocommerce: http://docs.woothemes.com/documentation/plugins/woocommerce/getting-started/
7. Setting Menu
7.1 Create/Edit Menu
From your Dashboard admin, navigate to Appearance >> Menu at here you can
- Select a menu to edit
- or Click create a new menu

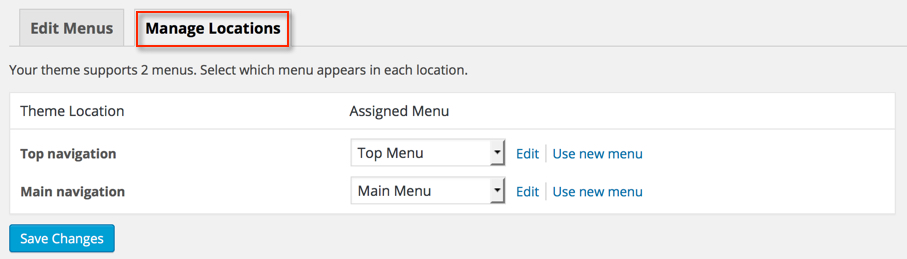
7.2 Manage Menu Locations
From your Dashboard admin, navigate to Appearance >> Menu >> Tab: Manage Locations at here you need Assign menu for Theme locations
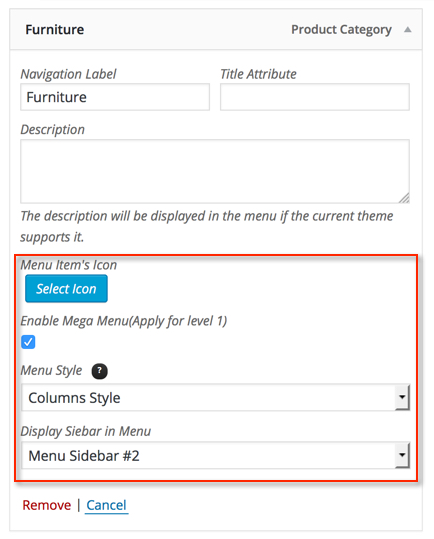
7.3 Setting Mega Menu
At menu item we provided option to Enable Mega Menu you can sellect it
8.Testimonial & Brand
We supported 2 post type: Testimonial & Brand. And we provided 2 shortcodes(SNS Our Brand, SNS Testimonial) to dispay them to any page
8.1 Create/edit Testimonial
From your Admin panel navigate to Testimonial >> Testimonial, then click edit or sellect Add new and fill your information
8.2 Create/edit Brand
From your Admin panel navigate to Our Brands >> Our Brands, then click edit or sellect Add new and fill your information
9.Child Theme
We have provided a child theme package ready for you to use if you wish to make changes to files, while keeping them through updates. The child theme is included within the main download folder, and is named snssimen-child all you need to do is upload this as well as the standard "snssimen" folder, and then activate the child theme in Appearance > Themes from the WordPress menu.
NOTE: To know more about the child themes follow http://codex.wordpress.org/Child_Themes
10. How to translate the theme
There are 2 methods to translate
10.1 Translate Inside The Theme
This is is the traditional method, and the method most of our users use. The locate the Languages folder, follow this path: wp-content/themes/snssimen/languages
Despite this being the most popular, this method has one downside. Whenever users update the theme and the plugin, the whole Theme folder is replaced with a new and updated folder, which in turn overwrites their translation files.
If you choose to store your language files using this method, remember that the file structure is only the language name. For example, if the language files are in the Deutsch language, the file names would be en_US.mo and en_US.po.
You can translate default po file with POEdit tool. You can see here for more details.
IMPORTANT NOTE: If you choose to use this method, don't forget to backup files you don't want to lose before updating snssimen.
10.2 Translate use WPML Plugin
WPML is the most popular plugin for multi language support, Porto is fully compatible with WPML. Below you will find documentation their team created for using WPML plugin with Porto. If you've purchased WPML and have any questions or issues, please check the links below.
- WPML Plugin - The highly recommended plugin to manage multi-lingual sites
- WPML Forum Support - If you bought WPML then you get free support from their amazing team
- Translating Widgets - Tutorial recommended by wpml team for translating widgets
Click Here To Purchase WPML Plugin!
11. Update History
	15 August 2024: Update to Version 4.6
		- Compatible with WordPress 6.6.1
		- Compatible with plugin WPBakery Page Builder version 7.8, plugin Slider Revolution version 6.7.17
		- Compatible with plugin WooCommerce version 9.1.4
	04 March 2024: Update to Version 4.5
		- Compatible with WordPress 6.4.3
		- Compatible with plugin WPBakery Page Builder version 7.5
		- Compatible with plugin WooCommerce version 8.6.1
	25 January 2024: Update to Version 4.4
		- Compatible with WordPress 6.4.2
		- Compatible with plugin WPBakery Page Builder version 7.4, plugin Slider Revolution version 6.6.20
		- Compatible with plugin WooCommerce version 8.5.1
	13 February 23: Updated version 4.3
		- Updated: Compatible with WooCommerce 7.3.0
		- Updated: Compatible with plugin WPBakery Page Builder 6.10.0, Slider Revolution 6.6.10
		- Updated: Compatible with WordPress 6.1.1
	22 August 2022: Update to Version 4.2
		- Compatible with WordPress 6.0.1
		- Compatible with plugin WPBakery Page Builder version 6.9.0, plugin Slider Revolution version 6.5.31
		- Compatible with plugin WooCommerce version 6.8.1

	....


	25 January 2016: Update to Version 1.3
		- Improved shortcode SNS Product Tabs, increase speed load site
	23 January 2016: Update to Version 1.2
		- Improved product shop/category page
		- Added lazyload for product image
		- Improved speed load site
			Note:
			*, Please ensure you have setting for option Admin >> SNS Simen >> Advance >> SCSS Compile is Only compile when don't have the css file
			*, In the next version(1.3) we'll continute improve speed load site via add ajax for click tabs product

	9 January 2016: Update to Version 1.1
		- Improved style vc_row on handle devices
		- Fixed custom thumbnail at product category
		- Added option show/hide Top Header Left
	29 December 2015: Released Version 1.0